
k8s 安装
kubeadm安装
环境配置
关闭防火墙: 如果是云服务器,需要设置安全组策略放行端口
systemctl stop firewalld
systemctl disable firewalld
修改 hostname
hostnamectl set-hostname k8s-01
echo "127.0.0.1   $(hostname)" >> /etc/hosts
reboot
关闭 selinux:
sed -i 's/enforcing/disabled/' /etc/selinux/config
setenforce 0
关闭 swap:
swapoff -a
sed -ri 's/.*swap.*/#&/' /etc/fstab
修改 /etc/sysctl.conf
# 如果有配置,则修改
sed -i "s#^net.ipv4.ip_forward.*#net.ipv4.ip_forward=1#g"  /etc/sysctl.conf
sed -i "s#^net.bridge.bridge-nf-call-ip6tables.*#net.bridge.bridge-nf-call-ip6tables=1#g"  /etc/sysctl.conf
sed -i "s#^net.bridge.bridge-nf-call-iptables.*#net.bridge.bridge-nf-call-iptables=1#g"  /etc/sysctl.conf
sed -i "s#^net.ipv6.conf.all.disable_ipv6.*#net.ipv6.conf.all.disable_ipv6=1#g"  /etc/sysctl.conf
sed -i "s#^net.ipv6.conf.default.disable_ipv6.*#net.ipv6.conf.default.disable_ipv6=1#g"  /etc/sysctl.conf
sed -i "s#^net.ipv6.conf.lo.disable_ipv6.*#net.ipv6.conf.lo.disable_ipv6=1#g"  /etc/sysctl.conf
sed -i "s#^net.ipv6.conf.all.forwarding.*#net.ipv6.conf.all.forwarding=1#g"  /etc/sysctl.conf
# 可能没有,追加
echo "net.ipv4.ip_forward = 1" >> /etc/sysctl.conf
echo "net.bridge.bridge-nf-call-ip6tables = 1" >> /etc/sysctl.conf
echo "net.bridge.bridge-nf-call-iptables = 1" >> /etc/sysctl.conf
echo "net.ipv6.conf.all.disable_ipv6 = 1" >> /etc/sysctl.conf
echo "net.ipv6.conf.default.disable_ipv6 = 1" >> /etc/sysctl.conf
echo "net.ipv6.conf.lo.disable_ipv6 = 1" >> /etc/sysctl.conf
echo "net.ipv6.conf.all.forwarding = 1"  >> /etc/sysctl.conf
# 执行命令以应用
sysctl -p
安装 docker
sudo yum remove docker*
sudo yum install -y yum-utils
#配置docker yum 源
sudo yum-config-manager --add-repo http://mirrors.aliyun.com/docker-ce/linux/centos/docker-ce.repo
#安装docker 19.03.9
yum install -y docker-ce-3:19.03.9-3.el7.x86_64  docker-ce-cli-3:19.03.9-3.el7.x86_64 containerd.io

#安装docker 19.03.9   docker-ce  19.03.9
yum install -y docker-ce-19.03.9-3  docker-ce-cli-19.03.9 containerd.io

#启动服务
systemctl start docker
systemctl enable docker

sudo systemctl daemon-reload
sudo systemctl restart docker
安装 k8s 核心(都执行)
配置 K8S 的 yum 源
cat <<EOF > /etc/yum.repos.d/kubernetes.repo
[kubernetes]ß
name=Kubernetes
baseurl=http://mirrors.aliyun.com/kubernetes/yum/repos/kubernetes-el7-x86_64
enabled=1
gpgcheck=0
repo_gpgcheck=0
gpgkey=http://mirrors.aliyun.com/kubernetes/yum/doc/yum-key.gpg
       http://mirrors.aliyun.com/kubernetes/yum/doc/rpm-package-key.gpg
EOF
卸载旧版本,安装新版本
yum remove -y kubelet kubeadm kubectl

# 查看可以安装的版本
yum list kubelet --showduplicates | sort -r

# 安装kubelet、kubeadm、kubectl 指定版本
yum install -y kubelet-1.21.0 kubeadm-1.21.0 kubectl-1.21.0

# 开机启动kubelet
systemctl enable kubelet && systemctl start kubelet
初始化 master 节点
创建 images.sh,vim images.sh粘贴以下命令
docker pull k8s.gcr.io/kube-apiserver:v1.21.9
docker pull k8s.gcr.io/kube-controller-manager:v1.21.9
docker pull k8s.gcr.io/kube-scheduler:v1.21.9
docker pull k8s.gcr.io/kube-proxy:v1.21.9
docker pull k8s.gcr.io/pause:3.4.1
docker pull k8s.gcr.io/etcd:3.4.13-0
docker pull k8s.gcr.io/coredns/coredns:v1.8.0
chmod +x images.shß
sh images.sh
kubeadm init master 节点
kubeadm init \
--apiserver-advertise-address=192.168.99.19 \
--kubernetes-version v1.23.3 \
--service-cidr=10.99.0.0/16 \
--pod-network-cidr=10.124.0.0/16
复制相关文件夹
  mkdir -p $HOME/.kube
  sudo cp -i /etc/kubernetes/admin.conf $HOME/.kube/config
  sudo chown $(id -u):$(id -g) $HOME/.kube/config
导出环境变量
export KUBECONFIG=/etc/kubernetes/admin.conf
部署一个 pod 网络
kubectl apply -f https://docs.projectcalico.org/manifests/calico.yaml
命令检查
kubectl get pod -A  ##获取集群中所有部署好的应用Pod
kubectl get nodes  ##查看集群所有机器的状态
初始化 worker 节点(worker 执行)
##过期怎么办
kubeadm token create --print-join-command
kubeadm join --token y1eyw5.ylg568kvohfdsfco --discovery-token-ca-cert-hash sha256: 6c35e4f73f72afd89bf1c8c303ee55677d2cdb1342d67bb23c852aba2efc7c73
验证集群
#获取所有节点
kubectl get nodes
kubersphere安装
多节点安装
从 GitHub 发布页面下载 KubeKey 或直接使用以下命令。
curl -sfL https://get-kk.kubesphere.io | VERSION=v3.0.13 sh -
执行以上命令会下载最新版 KubeKey,您可以修改命令中的版本号下载指定版本。
为 kk 添加可执行权限:
chmod +x kk
创建集群
对于多节点安装,您需要通过指定配置文件来创建集群。
./kk create config [--with-kubernetes version] [--with-kubesphere version] [(-f | --file) path]
- 安装 KubeSphere 3.4 的建议 Kubernetes 版本:v1.20.x、v1.21.x、* v1.22.x、* v1.23.x、* v1.24.x、* v1.25.x 和 * v1.26.x。带星号的版本可能出现边缘节点部分功能不可用的情况。因此,如需使用边缘节点,推荐安装 v1.23。如果不指定 Kubernetes 版本,KubeKey 将默认安装 Kubernetes v1.23.10。有关受支持的 Kubernetes 版本的更多信息,请参见支持矩阵。
- 如果您在此步骤的命令中不添加标志 --with-kubesphere,则不会部署 KubeSphere,只能使用配置文件中的 addons 字段安装,或者在您后续使用 ./kk create cluster 命令时再次添加这个标志。
- 如果您添加标志 --with-kubesphere 时不指定 KubeSphere 版本,则会安装最新版本的 KubeSphere
可以使用默认配置创建示例配置文件,也可以为该文件指定其他文件名或其他文件夹。
./kk create config [-f ~/myfolder/abc.yaml]
可以指定要安装的 KubeSphere 版本(例如 --with-kubesphere v3.4.0)。
./kk create config --with-kubesphere [version]
编辑配置文件
如果您不更改名称,那么将创建默认文件 config-sample.yaml。编辑文件,以下是多节点集群(具有一个主节点)配置文件的示例。
spec:
  hosts:
  - {name: master, address: 192.168.0.2, internalAddress: 192.168.0.2, user: ubuntu, password: Testing123}
  - {name: node1, address: 192.168.0.3, internalAddress: 192.168.0.3, user: ubuntu, password: Testing123}
  - {name: node2, address: 192.168.0.4, internalAddress: 192.168.0.4, user: ubuntu, password: Testing123}
  roleGroups:
    etcd:
    - master
    control-plane:
    - master
    worker:
    - node1
    - node2
  controlPlaneEndpoint:
    domain: lb.kubesphere.local
    address: ""
    port: 6443
主机
请参照上方示例在 hosts 下列出您的所有机器并添加详细信息。
name:实例的主机名。
address:任务机和其他实例通过 SSH 相互连接所使用的 IP 地址。根据您的环境,可以是公有 IP 地址或私有 IP 地址。例如,一些云平台为每个实例提供一个公有 IP 地址,用于通过 SSH 访问。在这种情况下,您可以在该字段填入这个公有 IP 地址。
internalAddress:实例的私有 IP 地址。
使用密码登录示例
hosts:
  - {name: master, address: 192.168.0.2, internalAddress: 192.168.0.2, port: 8022, user: ubuntu, password: Testing123}
默认 root 用户示例:
hosts:
  - {name: master, address: 192.168.0.2, internalAddress: 192.168.0.2, password: Testing123}
使用 SSH 密钥的无密码登录示例:
hosts:
  - {name: master, address: 192.168.0.2, internalAddress: 192.168.0.2, privateKeyPath: "~/.ssh/id_rsa"}
配置完成后创建集群
如果使用其他名称,则需要将下面的 config-sample.yaml 更改为您自己的文件。
./kk create cluster -f config-sample.yaml
完成安装
安装完成后,您会看到如下内容:
#####################################################
###              Welcome to KubeSphere!           ###
#####################################################


Console: http://192.168.0.2:30880
Account: admin
Password: P@88w0rd


NOTES:
  1. After you log into the console, please check the
     monitoring status of service components in
     the "Cluster Management". If any service is not
     ready, please wait patiently until all components
     are up and running.
  2. Please change the default password after login.


#####################################################
https://kubesphere.io             20xx-xx-xx xx:xx:xx
#####################################################
高可用集群安装
高可用 Kubernetes 集群能够确保应用程序在运行时不会出现服务中断,这也是生产的需求之一。为此,有很多方法可供选择以实现高可用。
本教程演示了如何配置 Keepalived 和 HAproxy 使负载均衡、实现高可用。
- 准备主机。
- 配置 Keepalived 和 HAproxy。
- 使用 KubeKey 创建 Kubernetes 集群,并安装 KubeSphere。
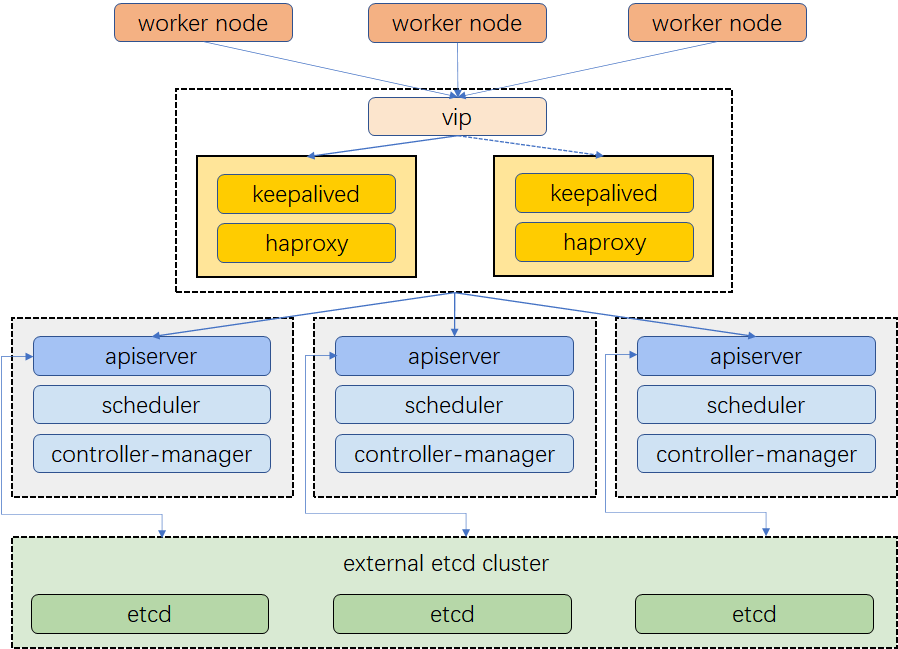
请注意,在本文中,Keepalived 和 HAproxy 没有安装在任何主节点上。但您也可以这样做,并同时实现高可用。然而,配置两个用于负载均衡的特定节点(您可以按需增加更多此类节点)会更加安全。这两个节点上只安装 Keepalived 和 HAproxy,以避免与任何 Kubernetes 组件和服务的潜在冲突。
| IP地址 | 主机名 | 角色 |
|---|---|---|
| 172.16.0.2 | lb1 | Keepalived & HAproxy |
| 172.16.0.3 | lb2 | Keepalived & HAproxy |
| 172.16.0.4 | master1 | master, etcd |
| 172.16.0.5 | master2 | master, etcd |
| 172.16.0.6 | master3 | master, etcd |
| 172.16.0.7 | worker1 | worker |
| 172.16.0.8 | worker2 | worker |
| 172.16.0.9 | worker3 | worker |
| 172.16.0.10 | 虚拟 IP 地址 |
配置负载均衡
Keepalived 提供 VRRP 实现,并允许您配置 Linux 机器使负载均衡,预防单点故障。HAProxy 提供可靠、高性能的负载均衡,能与 Keepalived 完美配合。
由于 lb1 和 lb2 上安装了 Keepalived 和 HAproxy,如果其中一个节点故障,虚拟 IP 地址(即浮动 IP 地址)将自动与另一个节点关联,使集群仍然可以正常运行,从而实现高可用。若有需要,也可以此为目的,添加更多安装 Keepalived 和 HAproxy 的节点。
先运行以下命令安装 Keepalived 和 HAproxy
yum install keepalived haproxy psmisc -y
HAproxy
在两台用于负载均衡的机器上运行以下命令以配置 Proxy(两台机器的 Proxy 配置相同):
vim /etc/haproxy/haproxy.cfg
以下是示例配置,供您参考(请注意 server 字段。请记住 6443 是 apiserver 端口):
global
    log /dev/log  local0 warning
    chroot      /var/lib/haproxy
    pidfile     /var/run/haproxy.pid
    maxconn     4000
    user        haproxy
    group       haproxy
    daemon


   stats socket /var/lib/haproxy/stats


defaults
  log global
  option  httplog
  option  dontlognull
        timeout connect 5000
        timeout client 50000
        timeout server 50000


frontend kube-apiserver
  bind *:6443
  mode tcp
  option tcplog
  default_backend kube-apiserver


backend kube-apiserver
    mode tcp
    option tcplog
    option tcp-check
    balance roundrobin
    default-server inter 10s downinter 5s rise 2 fall 2 slowstart 60s maxconn 250 maxqueue 256 weight 100
    server kube-apiserver-1 172.16.0.4:6443 check # Replace the IP address with your own.
    server kube-apiserver-2 172.16.0.5:6443 check # Replace the IP address with your own.
    server kube-apiserver-3 172.16.0.6:6443 check # Replace the IP address with your own.
保存文件并运行以下命令以重启 HAproxy
systemctl restart haproxy
使 HAproxy 在开机后自动运行:
systemctl enable haproxy
确保您在另一台机器 (lb2) 上也配置了 HAproxy。
Keepalived
两台机器上必须都安装 Keepalived,但在配置上略有不同。
运行以下命令以配置 Keepalived。
vi /etc/keepalived/keepalived.conf
以下是示例配置 (lb1),供您参考:
global_defs {
  notification_email {
  }
  router_id LVS_DEVEL
  vrrp_skip_check_adv_addr
  vrrp_garp_interval 0
  vrrp_gna_interval 0
}


vrrp_script chk_haproxy {
  script "killall -0 haproxy"
  interval 2
  weight 2
}


vrrp_instance haproxy-vip {
  state BACKUP
  priority 100
  interface eth0                       # Network card
  virtual_router_id 60
  advert_int 1
  authentication {
    auth_type PASS
    auth_pass 1111
  }
  unicast_src_ip 172.16.0.2      # The IP address of this machine
  unicast_peer {
    172.16.0.3                         # The IP address of peer machines
  }

  virtual_ipaddress {
    172.16.0.10/24                  # The VIP address
  }

  track_script {
    chk_haproxy
  }
}
- 对于
interface字段,您必须提供自己的网卡信息。您可以在机器上运行 ifconfig 以获取该值。 - 为
unicast_src_ip提供的 IP 地址是您当前机器的 IP 地址。对于也安装了 HAproxy 和 Keepalived 进行负载均衡的其他机器,必须在字段 unicast_peer 中输入其 IP 地址。
保存文件并运行以下命令以重启 Keepalived。
systemctl restart keepalived
使 Keepalived 在开机后自动运行:
systemctl enable keepalived
确保您在另一台机器 (lb2) 上也配置了 Keepalived。
验证高可用
在开始创建 Kubernetes 集群之前,请确保已经测试了高可用。
在机器 lb1 上,运行以下命令:
[root@lb1 ~]# ip a s
1: lo: <LOOPBACK,UP,LOWER_UP> mtu 65536 qdisc noqueue state UNKNOWN group default qlen 1000
    link/loopback 00:00:00:00:00:00 brd 00:00:00:00:00:00
    inet 127.0.0.1/8 scope host lo
       valid_lft forever preferred_lft forever
    inet6 ::1/128 scope host
       valid_lft forever preferred_lft forever
2: eth0: <BROADCAST,MULTICAST,UP,LOWER_UP> mtu 1500 qdisc mq state UP group default qlen 1000
    link/ether 52:54:9e:27:38:c8 brd ff:ff:ff:ff:ff:ff
    inet 172.16.0.2/24 brd 172.16.0.255 scope global noprefixroute dynamic eth0
       valid_lft 73334sec preferred_lft 73334sec
    inet 172.16.0.10/24 scope global secondary eth0 # The VIP address
       valid_lft forever preferred_lft forever
    inet6 fe80::510e:f96:98b2:af40/64 scope link noprefixroute
       valid_lft forever preferred_lft forever
如上图所示,虚拟 IP 地址已经成功添加。模拟此节点上的故障:
systemctl stop haproxy
再次检查浮动 IP 地址,您可以看到该地址在 lb1 上消失了。
[root@lb1 ~]# ip a s
1: lo: <LOOPBACK,UP,LOWER_UP> mtu 65536 qdisc noqueue state UNKNOWN group default qlen 1000
    link/loopback 00:00:00:00:00:00 brd 00:00:00:00:00:00
    inet 127.0.0.1/8 scope host lo
       valid_lft forever preferred_lft forever
    inet6 ::1/128 scope host
       valid_lft forever preferred_lft forever
2: eth0: <BROADCAST,MULTICAST,UP,LOWER_UP> mtu 1500 qdisc mq state UP group default qlen 1000
    link/ether 52:54:9e:27:38:c8 brd ff:ff:ff:ff:ff:ff
    inet 172.16.0.2/24 brd 172.16.0.255 scope global noprefixroute dynamic eth0
       valid_lft 72802sec preferred_lft 72802sec
    inet6 fe80::510e:f96:98b2:af40/64 scope link noprefixroute
       valid_lft forever preferred_lft forever
理论上讲,若配置成功,该虚拟 IP 会漂移到另一台机器 (lb2) 上。在 lb2 上运行以下命令,这是预期的输出:
[root@lb2 ~]# ip a s
1: lo: <LOOPBACK,UP,LOWER_UP> mtu 65536 qdisc noqueue state UNKNOWN group default qlen 1000
    link/loopback 00:00:00:00:00:00 brd 00:00:00:00:00:00
    inet 127.0.0.1/8 scope host lo
       valid_lft forever preferred_lft forever
    inet6 ::1/128 scope host
       valid_lft forever preferred_lft forever
2: eth0: <BROADCAST,MULTICAST,UP,LOWER_UP> mtu 1500 qdisc mq state UP group default qlen 1000
    link/ether 52:54:9e:3f:51:ba brd ff:ff:ff:ff:ff:ff
    inet 172.16.0.3/24 brd 172.16.0.255 scope global noprefixroute dynamic eth0
       valid_lft 72690sec preferred_lft 72690sec
    inet 172.16.0.10/24 scope global secondary eth0   # The VIP address
       valid_lft forever preferred_lft forever
    inet6 fe80::f67c:bd4f:d6d5:1d9b/64 scope link noprefixroute
       valid_lft forever preferred_lft forever
如上所示,高可用已经配置成功。
创建 Kubernetes 集群
从 GitHub 发布页面下载 KubeKey 或直接使用以下命令。
curl -sfL https://get-kk.kubesphere.io | VERSION=v3.0.13 sh -
执行以上命令会下载最新版 KubeKey,您可以修改命令中的版本号下载指定版本。
为 kk 添加可执行权限:
chmod +x kk
使用默认配置创建一个示例配置文件。此处以 Kubernetes v1.22.12 作为示例。
./kk create config --with-kubesphere v3.4.0 --with-kubernetes v1.22.12
配置config.yml
...
spec:
  hosts:
  - {name: master1, address: 172.16.0.4, internalAddress: 172.16.0.4, user: root, password: Testing123}
  - {name: master2, address: 172.16.0.5, internalAddress: 172.16.0.5, user: root, password: Testing123}
  - {name: master3, address: 172.16.0.6, internalAddress: 172.16.0.6, user: root, password: Testing123}
  - {name: worker1, address: 172.16.0.7, internalAddress: 172.16.0.7, user: root, password: Testing123}
  - {name: worker2, address: 172.16.0.8, internalAddress: 172.16.0.8, user: root, password: Testing123}
  - {name: worker3, address: 172.16.0.9, internalAddress: 172.16.0.9, user: root, password: Testing123}
  roleGroups:
    etcd:
    - master1
    - master2
    - master3
    control-plane:
    - master1
    - master2
    - master3
    worker:
    - worker1
    - worker2
    - worker3
  controlPlaneEndpoint:
    domain: lb.kubesphere.local
    address: 172.16.0.10   # The VIP address
    port: 6443
...
- 请使用您自己的 VIP 地址来替换 controlPlaneEndpoint.address 的值。
配置完成后创建集群
如果使用其他名称,则需要将下面的 config-sample.yaml 更改为您自己的文件。
./kk create cluster -f config-sample.yaml
完成安装
安装完成后,您会看到如下内容:
#####################################################
###              Welcome to KubeSphere!           ###
#####################################################


Console: http://172.16.0.4:30880
Account: admin
Password: P@88w0rd


NOTES:
  1. After you log into the console, please check the
     monitoring status of service components in
     the "Cluster Management". If any service is not
     ready, please wait patiently until all components
     are up and running.
  2. Please change the default password after login.


#####################################################
https://kubesphere.io             20xx-xx-xx xx:xx:xx
#####################################################
sealos安装
可以使用 Sealos 来部署
离线安装,包含所有依赖,内核负载不依赖 haproxy keepalived,纯 golang 开发,99 年证书。1.12.0 版本的离线包搭载了最新版本的 Containerd,还支持 arm64 架构
下载并安装 sealos
wget -c https://sealyun.oss-cn-beijing.aliyuncs.com/latest/sealos
chmod +x sealos && mv sealos /usr/bin
下载离线资源包:
wget -c https://sealyun.oss-cn-beijing.aliyuncs.com/7b6af025d4884fdd5cd51a674994359c-1.18.0/kube1.18.0.tar.gz
安装一个三 master 的高可用 Kubernetes 集群:
sealos init --passwd 123456
--master 192.168.0.2  --master 192.168.0.3  --master 192.168.0.4
--node 192.168.0.5
--pkg-url /root/kube1.18.0.tar.gz
--version v1.18.0
官方一键安装
curl -sfL https://gh-proxy.com/https://raw.githubusercontent.com/labring/sealos/main/scripts/cloud/install.sh -o /tmp/install.sh && bash /tmp/install.sh --image-registry=registry.cn-shanghai.aliyuncs.com --zh --proxy-prefix=https://gh-proxy.com